|
Photo plays a vital role when it comes to Car selling. It is the first thing that will come into the play. If you are willing to discover where you can find the best car photo editing service, you are at the top place. Let’s find out which one will be the best one. In this article you will be able to find,
Let’s get started without wasting any time. Why car photo editing is important?  Online Vehicle marketing is getting more and more popular day by day. More importantly, people are engaging with an online platform for purchasing cars. When people purchase something the most priority they give to the photo. No one is going to spend money on the unattractive thing. So, there is no alternative way to attract buyers without an appealing photo. It doesn’t matter how much professionally you manage to capture the photo. Without doing any post-processing work, it will never provide a premium look. Cause, raw photos don’t have the power to capture all details with perfection. Even all professional photographer used to correct their photos by altering. There can be several reasons existing those are distracting customers from focusing on the car. Photo editing for Car gives you the option to fix those. There, it is a mandatory fact for every can seller to present the photo most attractively. Which types of editing to apply in your car photo? We all know the varieties of image editing sector. Car image editing is also the same. There are several images altering process available that can make your car photo mesmerizing. The first method that you can apply to make your vehicle appealing is background removal. Background Remove Service for Car 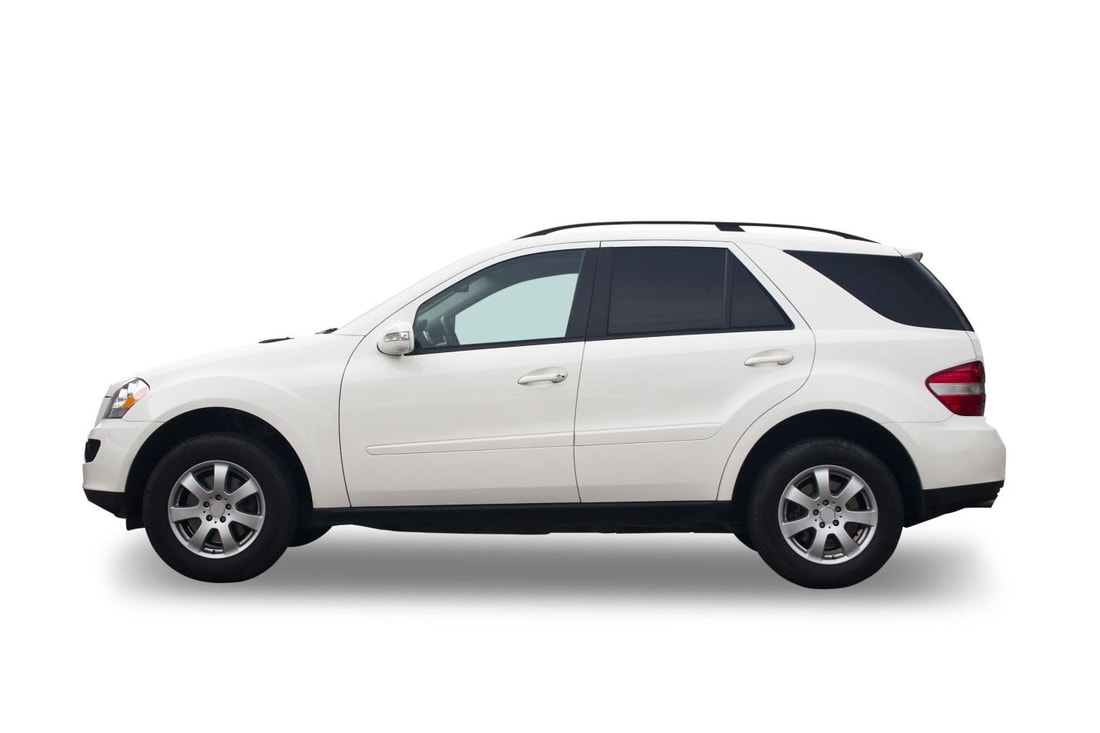 Background can be the main factor for distracting sometimes when it comes to car photo. That’s why deleting background can ensure to get rid of this problem. If you are looking for only one image editing technic to your image, I would recommend you deleting the background. It will not only ensure you to grab attention but also it will provide an appealing look. Car in a normal busy or regular background is not the best way to approach whatever. Another irritating thing is to pick the right background. It will make photo-shoot sessions longer. Why need to tolerate these problems? Instead, choose Clipping USA for the background removal of your car photos. Car Shadow Creation Service  After eliminating the background the next technique that you can apply is Car shadow creation service. It will bring a royal look in the vehicle image. When you are searching for something special for Vehicle imagery shadow is a simple but effective solution. All giant websites are using this effect for their vehicle photos. So, why are you making a delay to take the advantages? One more thing to inform, there are mainly two types of shadow creating service is applicable for cars. Natural shadow and reflection shadow. Natural shadow will look something like that picture in the above. Another one is reflection shadow service. It gives a reflected view of the vehicle at the beneath of the photo. This is a great service for colorful vehicles. You can choose between these two according to your need. Car Photo Enhancement Service  It gives the final touch for a vehicle before publishing the photo. There is numerous include in this category. The entire thing that is needed to bring a fresh and attractive look is included here. It denotes high-end retouching, Unwanted Item removal, Photos Merging, Blur background, HDR effect etc. You can earn so much benefit in a single category.
Where you can get these services? Clipping USA is offering all the services that are mentioned above. CUSA is a leading photo editing service provider since 2014. Throughout the last five years, they have done a decent job in this sector. With their 100+ professional graphics designer, they are sufficient enough to deliver you a satisfying result. They are available for 24 hours in seven days. So, you can place your order anytime. They are giving their services all around the world. You can get the service from any country. You don’t need to give any advance before getting delivery. The ordering procedure is simple. Visit the site and hit on “Get a Quote”. Then you will be replied within an hour. Submit your photo to their server. Don’t need to think about privacy it is 100% secured. Then you get your photo in your preferable time. Then pay the charge. If you are not satisfied with their work, you can ask for revisions. You don’t need to pay extra for this. To make a judgment on their quality you can also use the free trial option. Two images can be submitted for a free trial. What is the price of this service? You will get all of these services at an extremely affordable price from CUSA. The Price is starting from only $0.99 per image. Where will you find a better deal than that? I think you shouldn’t make a delay.
5 Comments
Transparent background is further than compulsory when you are working to expenditure image online. But most of us don’t know the essential trick. Are you belongs to one of them? Then and there this tutorial is obviously for you. You are going to learn the easiest approach to generate a transparent background in Photoshop. Right at the beginning, start with opening the picture. 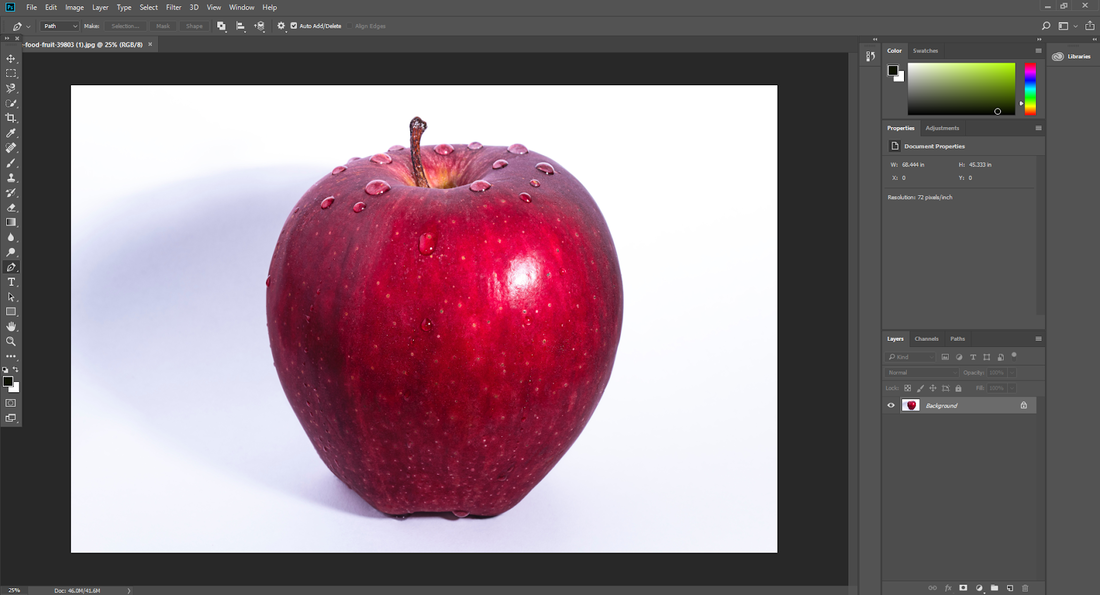 I am going to show with this apple. So, selecting the object is your primary task. There are a few tools in Photoshop those can be used for selecting an item. By the way, Pen tool is used in this lesson. Pick it from here. 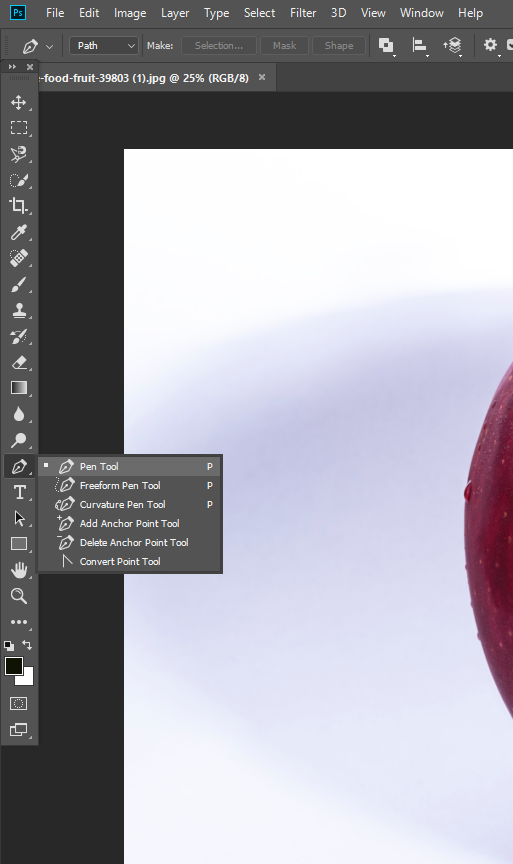 After choosing the tool starts you need to start the assortment process. There is a trick you can apply for making selection. Starting the selection from the below parts, this is a proven way to make it easy for you to select the object. Before you start selection make sure that you have select path here: 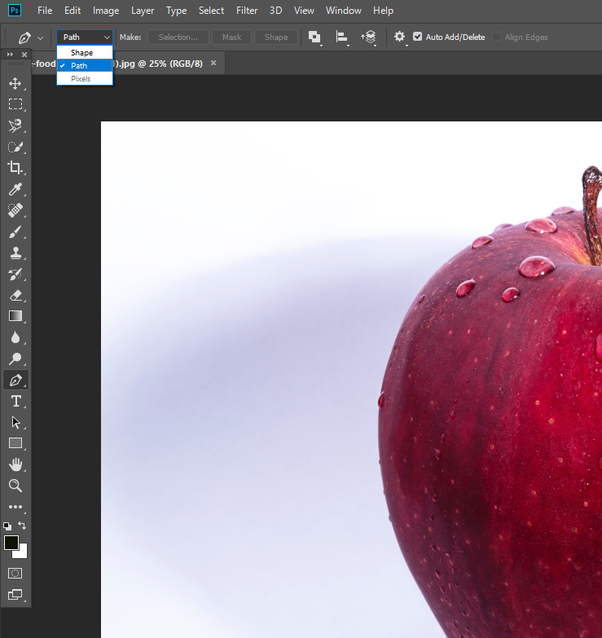 More importantly, zoom in the picture with CTRL and +. It will make your selection process lengthy but accurate. 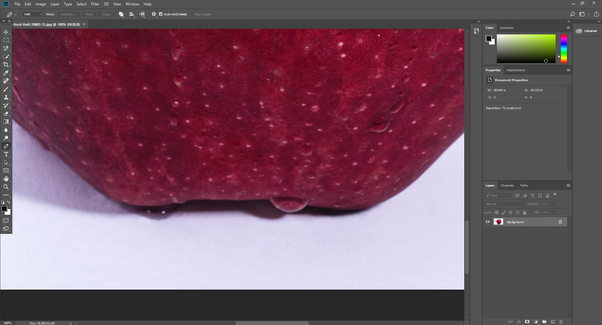 I zoom in the picture in that way at starting my selection from the below side of the apple. At the time you zoom in your picture deeply to move the image use mouse along with space button. Perform the assortment method carefully. After completing the selection zoom out your picture with CTRL and -, to back to the normal view. Your image will look something like that:  Now press the right button of the Mouse and pick make selection. 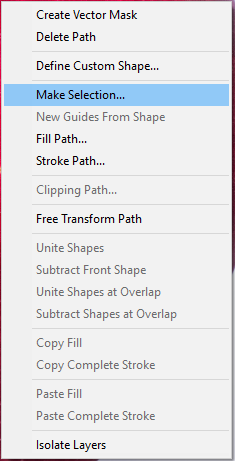 After making selection, the selected path will start moving. In Later part, go to select option and choose inverse. 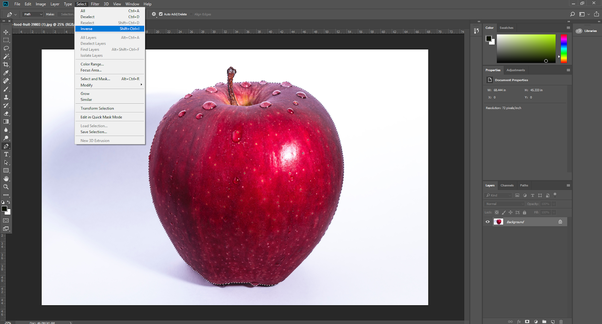 Then press on the Create Mask icon from the below of the layer panel. 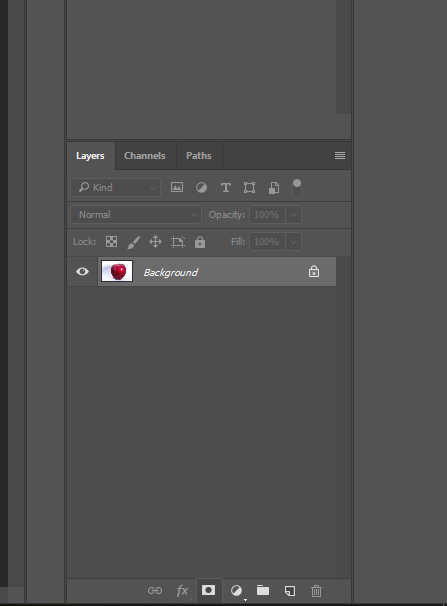 Formerly, you will notice that the background has become transparent. Just like this picture. 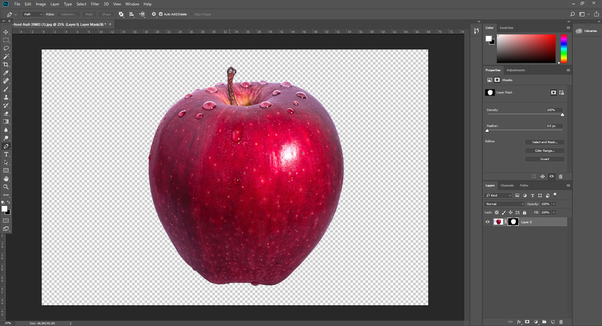 You could also done it buddy! Before saving the picture zooms in and inspects the boundaries. If there is edges or missing parts or extra elements then you have not done the selection procedure accurately. 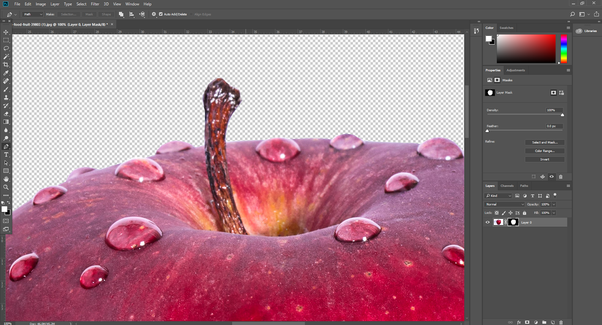 See the difference 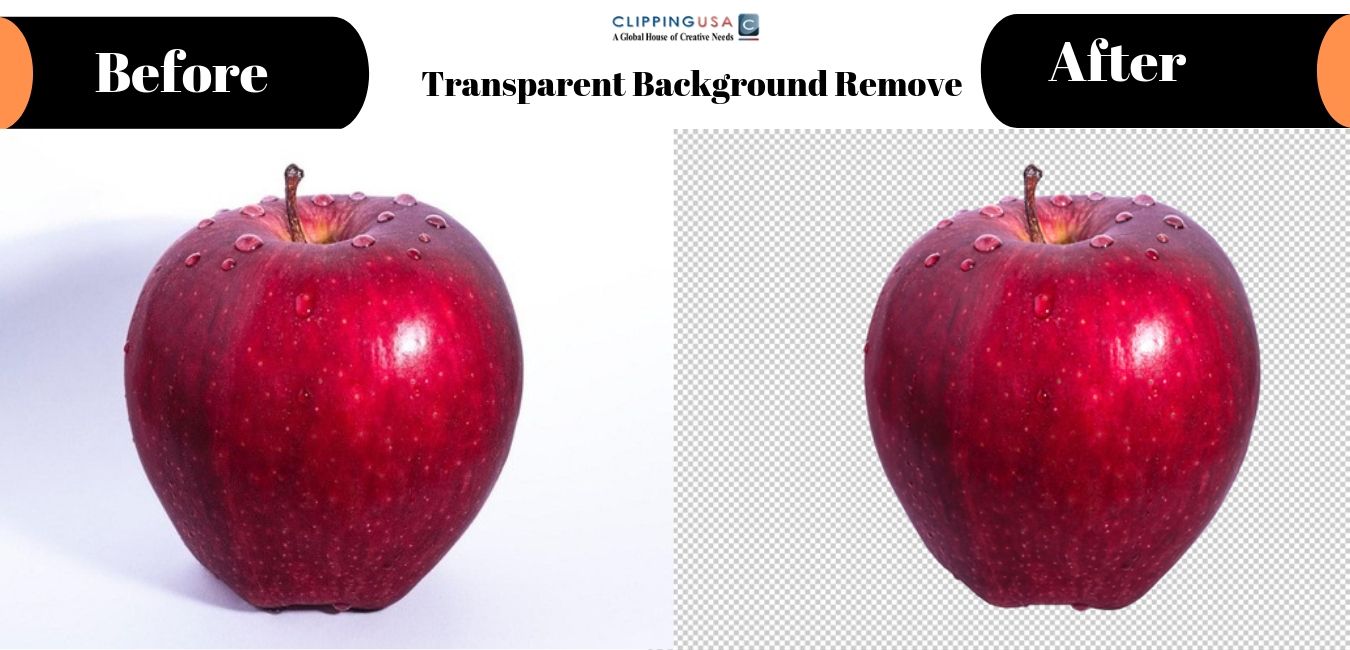 Don’t forget to save the picture in PNG. JPEG doesn’t support transparency.
From now on, you can also make transparent background in Photoshop. Photography post production is one of the most important tasks for a photo. It includes the task you do after taking a photo. The whole process of image editing is included in Photography post production. As photo editing is a wide term Photography post production has lots of variety too. 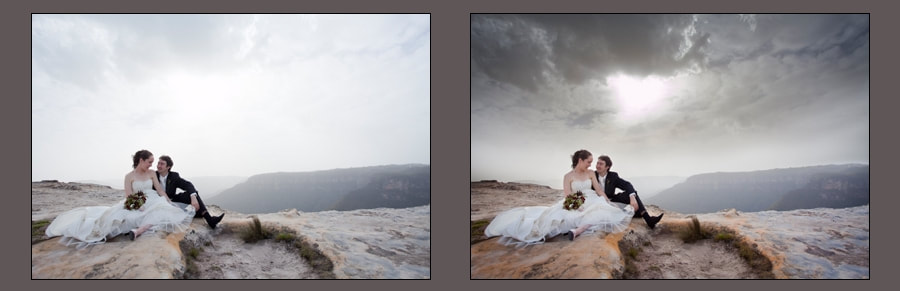 Photo can be edited in many ways. It actually depends on the motive how you are going to use your edited photo. For E-commerce product photography post production is related to clipping path and background remove. After photography session, we notice so many unpleasant facts with photos. Sometimes, we are not happy with background or sometimes unnecessary object that makes a picture boring. Post production gives us flexibilities to fix those errors. To do post photography work a good and professional photo editing software is must needed. One also needs to have some knowledge on photo editing. Post production work defines the ultimate looks of Photo editing. That’s why it needs to be done professionally. Any kind of compromise will effect on the final look of a photo.
If you want to do your photography post production work perfectly for your E-commerce business, Modeling or other types of photography, choose Clipping USA without any hesitation.  Demand of product photography has reach to the high. People are moving to online businesses quickly. The principle element of E-commerce business is photo. Two people are running comparable sorts of product business in online. They provide comparative sorts of service quality however there is a massive difference between their sales. Do you know why? Picture is having the effect here. Photos of your products are such a medium, that can destroy your business and construct your business. Today we will examine around 7 such mistakes about product photography that numerous people do and they regret later. By reading this article, you can know these 7 certainties and you can keep yourself in the safe site. Avoid this article at your own hazard. Let's get started.  Mistake Number 1: Using Attractive Background
When you are dealing with product photography, you can't use attractive background. Your primary motive is to make pleasant your customer with the nature of your product not with the background. You are harming yourself by doing this. An attractive background can perform damage from multiple points of view. When viewers show photo, their attention may divert from the product. Attempt to keep away from this mistake. Mistake Number 2: Using Auto Mode This is another mistake bunches of photographer do. Utilizing Auto mode, when capturing a photo is certifiably not a brilliant choice by any means. Picture taken in auto mode can't provide you accurate result. There are loads of settings is your camera. Learn to use them properly. Use ISO, White Balance, Shutter Speed, FV, Exposure compensation properly. Try not to trust on Auto mode, otherwise your viewers will lose trust from you. Mistake Number 3: Taking photo in Low Light and High light It is one of the most noticeably terrible mistakes that you need to maintain a strategic distance from. Light is a key factor for perfect photography. One should be very careful about this. Never take photos in low light. At the same time, don't be flexible use high light. That can provide a consumer look in your photo. Continuously keep this in your psyche. Mistake Number 4: Distance between camera and object There ought to be a decent distance between camera and object. Try not to capture the shot from too far neither take from excessively close. Attempt to capture the full frame from a standard distance. So that, at the time viewers see it just because they get a clear idea about it. Mistake Number 5: Editing Too Much Editing is a required thing for product photography. One must do some post processing work after taking photos. In any case, you can't edit your photo an excess of that it loses its unique look. In the event that you demonstrate a picture of something yet provide something different that isn't coordinating with the picture, you will lose your customers step by step. On the off chance that you don't have enough knowledge on editing, hire someone professional who can do it for you. Mistake Number 6: Focus Clearness is constantly attractive to human brain. Along these lines, don't use foggy focus in your photo. Attempt to make your photo as sharp as could be expected under the circumstances. You can set a high aperture by then. Ordinarily, the higher the aperture make the high sharpness. Set a high aperture number and demonstrate your client a sharp picture. Mistake Number 7: Same Angle Sometimes, people provide same photo from the same angle from different distances. This is a senseless mistake. Attempt to provide as much description as you can. More description means more views and more views dependably create a chance to generate sales. In this way, capture photos from different angles. Moreover, photo with same angle looks exhausting. Make your customer satisfied with photos from different sides. By maintaining a strategic distance from these mistakes one can make successful product photography career. E-commerce business owner can likewise earn benefit from this. They can shine in their business by maintaining a strategic distance from these mistakes. Much obliged me later.  It seems you are connected with Background removal tools. Background removing technique has a great importance in many perspectives. Especially, it carries a great value for Professional photographer, E-commerce business owner, real estate dealer, people who connected with print media. If you are one of them, you ought to read this whole article carefully. In this content, we are going to discuss about the advantages and disadvantages of online background removal tool, when it comes to professional Background. By reading this content, you can remove all of your confusion about online background removal tool. Should you use it? Or should you avoid? Is there any better option available? Let’s reveal all the answers. Before we jump to our main discussion, allow me to define what online background removal tool is. It is one kind of online tool that allows you to remove the background online without installing any software. It has some advantages with some disadvantages. Let’s know more specifically. Permit me to start with its advantages. Advantages:
Disadvantages:
That’s all about the advantages and disadvantages of online background for professional background. By analyzing both It can be said that, using any manual software like Adobe Photoshop and Corel PaintShop pro will be the better way to approach. If you can edit, do it by yourself. It will cost you some time but you will get sufficient results. If you have enough knowledge or time about background remove you can hire a professional photo editor. If you don’t know any professional editor, you can choose online background removal service provider like ClippingUSA. You can judge the quality first before placing an order with a free trial. |
 RSS Feed
